Tuesday, November 08, 2011

Chicken Salan

Salan is term used to describe a creamy curry. This recipe is currently my favourite Chicken curry recipe.

I first came across this recipe on Youtube. I have deviated from the original recipe by adding a tbsp of yoghurt to the curry while cooking it.


Ingredients
  •  Chicken preferably on bone without any skin. I prefer using the 825 gms of Tesco's Free Range Corn Fed Chicken drumstick and thighs
  • 2 medium onions, finely chopped
  • 8 cloves garlic, finely chopped
  • 2 inch piece of root ginger, finely chopped
  • 2-4 green finger chillies, finely chopped
  • 1 tsp tomato purée
  • 1 tbsp coriander powder
  • 0.5 tbsp cumin powder
  • 1 tsp turmeric powder
  • 1 tsp cumin seeds
  • 1 tsp Garam masala
  • 1 tbsp yoghurt
  • 3 tbsp olive oil
  • Fresh coriander leaves for garnishing.
  • Salt to taste
Method
  • Add the oil to a sauce pan and throw in the chopped onions. Mix them thoroughly and cover with a lid. Fry until the onions are dark brown.
  • Add a cup of water, mix and let it boil for about 3 minutes.
  • Add the dry spices, salt, garlic, ginger and chillies followed by the Chicken. Mix thoroughly, cover and let it cook for about 5 minutes.
  • Add the yoghurt and the tomato purée. Replace the lid and cook for a further 7 minutes until the chicken is cooked.
  • Switch off the heat and add the coriander leaves.
  • Let it rest for about 5 minutes. 
Serve with bread, rice or rotis.

    Palak Paneer

    My mom was always concerned with my younger brother's diet after he developed patches on his skin which the doctor blamed on vitamin deficiency. She learnt of this recipe to make spinach, called Palak in Hindi,  from our Punjabi neighbors and she hoped he would like it. My brother never developed a liking for spinach, but I ended up loving it.

    This dish is very popular in British Indian Restaurants where it is sold as Saag Paneer. They tend to use finely chopped spinach here instead of puréed spinach which I like to use. I have always associated Palak Paneer with puréed spinach and that is how I like it.

    In this version I use Indian cottage cheese called Paneer. This is the usual cottage cheese which has been strained through muslin and cut into blocks. These are available in 200 gm packs at Tescos. I tend to use only half of it and freeze the rest to use at a later date. You could substitute it with peeled and boiled chunks of potatoes instead.


    Ingredients

    • 500 grams of Spinach washed with the stems removed
    • 1 medium onion - chopped coarsely
    • 4 cloves of garlic 
    • 1 inch piece of ginger
    • 2 finger green chilies 
    • 2 Tomatoes - quartered
    • Paneer - Indian Cottage Cheese - cut into chunks
    • Vegetable oil - 2 tbsps
    • Salt to taste
    Method
    • Wash the spinach and let the water drain away. Transfer this to a saucepan, add a bit of salt and start the heat. The water on the leaf as a result of washing should be sufficient for boiling it. If you see the leaves burning, sprinkle a bit of water on them. The salt helps preserve the green colour. Do not cover the sauce pan. The leaves will shrivel down to a tiny fraction of the volume you started out with. Switch the heat off and leave it to cool. Once cooled, puree the spinach in a blender.
    • In another blender vessel add onions, garlic, ginger and the chilies and blend until you have a smooth paste.
    • Heat a sauce pan and add two tablespoons of oil to it.
    • Add the paste made earlier and fry until the raw taste of onion is no longer present. If the paste starts burning add a bit of water to it.
    • Add the quartered chunks of tomato to the pan and fry for a minute.
    • Add the pureed spinach, cover the pan and let it cook for about 5 minutes.
    • Add the chunks of paneer, cover the sauce pan and let it cook for another 3 minutes.
    • Once done, switch the heat off and let it rest for a few minutes.
    Serve with rice or rotis.

    Sunday, April 03, 2011

    Portugese Sea Food Rice

    A while back, Shyja  along with some colleagues were invited home by Portuguese friends for lunch. One of the highlights was a sea food rice which Shyja could not stop raving about. She kept pestering me to cook something similar. So after a few searches on Google followed by some calls to her friend, I have the following recipe.

    The recipe is based on the recipe listed here along with a few tips from Shyja's friend.

    The recipe calls for a variety of rice used in Portugal. Basmati will not do for this dish since the final form is rice in a broth. Basmati will I suspect turn into squishy mass in such a case. Since I couldn't get my hands on the exact variety of Portuguese rice, I had to settle on Spanish Paella rice instead. This in my opinion is a very good substitution.

    Ingredients

    • 1 onion - chopped fine
    • 4 cloves of garlic - chopped fine
    • 2/3rds of a can of peeled plum tomatoes
    • 1 capsicum
    • 1 400g pack frozen raw "Fruits de Mer" - this includes prawns, mussels, scallops, squid, etc
    • Paella rice - I used a 300 ml cup and filled it to the brim with rice. This serves 4-5
    • 2 cubes of Maggi chicken cubes
    • 4-5 crab sticks
    • Fresh coriander for garnishing
    • 1 tablespoon oil - I used olive oil
    • Salt to taste

    Method

    • Add 1 tablespoon Oil to the saucepan. 
    • Add chopped onion and garlic and fry till transparent. Add the chopped capsicum and cook for about 30 seconds.
    • Add 2/3rds of the tin of peeled plum tomatoes and cook till some of the tanginess of the tomatoes is gone.
    • Add washed Paella rice to the saucepan and mix well.
    • Add 3 cups of water to the saucepan. The volume of water should  be 3 times the volume of rice. Top up the water in case you have a danger of it getting dry.
    • Add the 2 cubes of Chicken stock to the cooking rice.
    • When the rice is halfway done, throw in the sea food(fruits de mer) and let it cook until rice is done. This shouldn't be longer then 7-8 mins.
    • When the rice is done, switch off the heat. The result should be rice in a very watery broth.
    • Add the crab sticks and mix.
    • Sprinkle fresh coriander on top.

    Tuesday, September 14, 2010

    Chicken Biryani - Kerala style

    There are many variations to Biryani. The 2 most famous ones are the Hyderabadi Biryani where the rice and meat are cooked together and the Lucknowi Biryani where the rice and meat are partly cooked separately, laid out in layers and finally cooked under pressure.

    My favourite version however is the one from down south in Kerala.
    Prawn Biryani at OneIndia
    I came across the recipe when searching for prawns biryani. The interesting twist in this version of the biryani is that the rice is cooked in diluted coconut milk. This gives it a very nice flavour.

    This is a very easy recipe where you only require one large vessel to cook it in. In my case, I use a pressure cooker. If you do not have a pressure cooker, you could use a vessel with a lid instead.

    For the coconut milk, I use Maggi Coconut milk powder. I also use Shaan Bombay Biryani spice mix. You could use other brands of biryani spice mix instead. This biryani masala contains chilly powder which makes it hot enough for me. In case your spice mix doesn't contain chilly powder or you like it hotter, you could add Red Chilly powder just before you add the tomatoes.

    Ingredients

    • Chicken - I use thigh pieces.
    • 1 Onion - Chopped
    • 2 Tomatoes - Chopped
    • Few mint leaves
    • Handful of fresh coriander
    • Ginger Garlic Paste
    • Turmeric powder
    • Basmati Rice - This depends on the number of people you cook for.
    • Whole Spices
      • 4 Green cardamom
      • 2 Black cardamom
      • 1 Stick cinnamon
      • 2 Star Anise
      • 4 Cloves
      • 2 Bay leaves

    Method

    • Soak the Basmati Rice for about 10 minutes. Do not keep it in water for longer then 10 minutes or the results would be squishy Biryani.
    • Heat oil in a pressure cooker base and add the whole spices to it.
    • Add chopped onion and let it fry until the onions are brown.
    • Add the chopped tomatoes to this mixture and cook till the tomatoes break down.
    • Add mint and coriander leaves and fry for another minute.
    • Add Chicken followed by the Biryani Spice mix. Mix the contents thoroughly.
    • You now need to add water diluted with coconut milk. It is very important to get this right. The rough guide is to add slight less then twice the amount of rice in terms of volume. This is because chicken leaves a lot of water while cooking. So if you use 3 cups of rice, I would use 5 1/2 cups of water with coconut milk. Mix the contents thoroughly  making sure you don't have anything sticking to the bottom.
    • Close the pressure cooker lid and let it cook until it lets out steam twice. In case you are not using a pressure cooker, let it cook till the water is completely soaked.
    • Switch the gas off and let it cool down slightly. In case you use the pressure cooker, take it off the stove and let it cool until the pressure is sufficiently low so that you can open the lid without any difficulty.
    • Serve with Raita.

    Monday, September 13, 2010

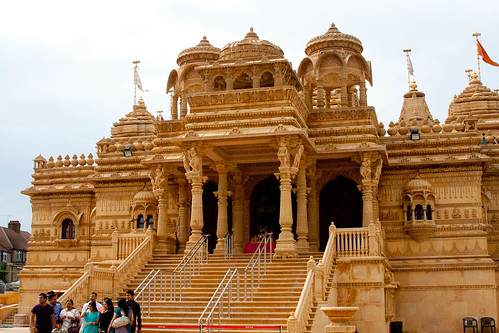
    Ealing Road Temple, London


    Pictures from the Ealing Road Temple. The carvings on the outside were very nice. They would not let me take pictures of the interiors which was also very nice.

    Even though there weren't too many people at the temple, there was temporary barriers set which took you around the temple. It felt more like an exhibition and less like a temple. This could have been setup because of the Janmashthami celebrations recently.

    The security and the notices which includes gems like 'You are responsible for your own safety in the temple.' just put me off.

    If you are looking for good vegetarian food, the restaurants outside the temple were very good. We had the Special Gujrati thali at a place called Dadima and it was very very good.

    Ealing Road Temple

    Tuesday, August 10, 2010

    Chicken Coriander

    Fresh coriander is my favourite herb. The problem with fresh coriander is that cannot be stored for over 3-4 days even when kept in the fridge. We have stored it successfully in the past by freezing the leaves. However it just doesn't taste the same.

    We had some left over coriander in the fridge which would have been destined for the bin if it wasn't used quickly. Having had and enjoyed chicken with coriander sauce back in India,  I wanted to cook some myself. I  decided to follow my own gut instinct in cooking it. The recipe is hardly original but the results turned out to be yummy.  I have tried to keep the usage of other spices to the bare minimum to avoid any distraction from the taste of coriander. The resulting sauce is tangy and has a strong taste of coriander.


    Ingredients


    • Fresh coriander leaves, 2 handfulls. 
    • Onion - 1
    • Tomato - 1
    • Ginger Garlic Paste
    • Green Chillies 2
    • Full fat plain yoghurt 3 table spoons.
    • Turmeric - half teaspoon
    • Coriander Powder - one teaspoon
    • 2 Chicken breast pieces chopped into cubes.
    • Salt to taste
    Method

    • Chop the onion and tomato into small pieces. 
    • In a blender, add half of the chopped onion, chopped tomato and fresh coriander. Add a bit of water if required. Blend to a paste.
    • In a saucepan, add a table spoon of oil and the remaining onion and fry until the onions turns translucent.
    • Add turmeric, ginger garlic paste and chopped green chillies to it and fry for another 2 minutes.
    • Add the blended mixture to the saucepan. Stir in the coriander powder and fry for another 3 minutes.
    • Add chicken and a small amount of water to prevent the sauce from burning. Cover the chicken with the coriander paste and let it cook until the chicken is partly done.
    • Mix yoghurt into the mixture. 
    • Add salt to taste. 
    • Cook until the chicken is completely done.
     Serve with rice or bread.

    Tuesday, July 13, 2010

    What we did in Venice

    Flying to Venice: 

    We took a Ryan air flight from Stanstead airport to Trevisio airport. We took an AVTO(local transport authority) bus from Treviso to Mystre. This costs 5 Euros  per person each way. We missed our stop at Mystre and ended up at the last stop which was Pizzale Roma in Venice.

    Stay:

    We stayed at the Garibaldi Hotel in Mestre. The number 2 bus is available right outside the hotel and takes you to Piazzalle Roma in Venice. The trip from the Hotel to Piazzale Roma took about 25 minutes each way.

    Travel:

    We took the three day travel card at the AVTO office at Pizzale Roma in Venice. If you get off at Mystre, get your travel card at the AVTO office there. The Travel Card is a RFID card which cost us 33 Euros per person and was valid for 72 hours from the time of the first swipe. This allows us to use the buses between Venice and Mystre as well as the vapouretto within Venice. You just need to swipe your cards on the ticket validating machines on the buses or at the Vapouretto stops.

    Land vehicles are only allowed upto Piazzalle Roma in Venice, there are no roads within Venice. So the only mode of transport are the Vapourettos. Vapourettos are boats which work like busses within Venice. There are Vapouretto stops all along the Grand Canal and along the outer edges of Venice. You are never too far from a Vapouretto stop.

    Getting around in Venice:

    Venice a compact city which can be easily seen on foot. All you need is a good map to take you around. Note that there are a lot of steps you will need to climb up and down. A buggy to push your kids around could turn out to be a bigger hassle then just letting them walk around.

    Places to see

    Most days we took the vapouretto from Pizzale Roma to San Marco also known as Saint Mark's square and began our trips from there. Make sure you visit the Doge's residence,  St Mark's Basillica, Rialto Bridge, Murano Glass Factory, Burrano. We found some very good deals for souvenirs being sold on carts at Burrano. You will have a lot of photo oppurtunities just walking in the narrow streets of Venice.

    Food

    Food was quiet expensive in Venice. I also found that eating a Pizza turns out to cost the same as eating at a fast food restaurant.

    Gondola

    Cost about 80 Euros for about 30 mins. It wasn't too exciting either.

    Venice in pictures.

    Setting a frost alarm on Home assistant

    One of the issues with winter is the possibility of ice covering your windscreen which needs to be cleared before you can drive. Clearing ou...